How to disable or enable USB Ports in Windows
1. Disable or Enable USB Mass Storage Devices using Registry.
If the administrator is smart then he would definitely do this. He would alter the settings through Registry Editor. Now how do you lock or unlock it ? You have to go right into where the administrator has been. Here is how.
Go to Start > Run , type “regedit” and press enter to open the registry editor. Navigate to the following key
HKEY_LOCAL_MACHINE\SYSTEM\
In the right pane, select Start and change the value to 3. Click OK. This will enable USB Ports and allow you to use USB or Pen drives. Or change the value to 4 and clock OK, this will disable USB ports

2. Disabling USB Ports from Device Manager.
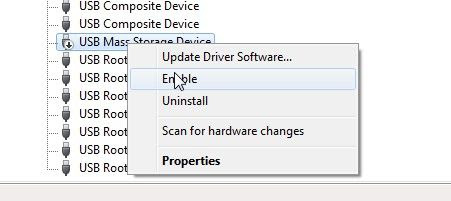
Still don’t find your USB ports working? you may have to look into the Device Manager. The Administrator could have possibly disabled the USB port here. Check out for any possibility in the Device Manager
 Go to Start > Run and type ‘devmgmt.msc’ and
press enter to open device manager. Now look for ‘Universal Serial bus Controller’
Expand the list and find if there is any red colored cross and enable the disabled port by right clicking on selected one and click Enable.
3. Now the third method is to Disable or Enable USB Ports on your computer from BIOS. This is a RISKY method. You could do this when you do not want to share your data with any. Some problems may arise due to this. Some got problem like they cannot enter into Bios after doing this. Do at your risk.
2. Press [F2] or [Del] as told in the mother board manual
3. Enter BIOS by entering BIOS password
4. In BIOS find advance settings or Onboard devices menu(change with BIOS manufacturer).
5. Select USB Configuration and press enter
6. Select the option to disable USB ports
Find USB configurations and Disable USB controllers to disable all USB ports. Change it to Enable if you want to enable. And exit from BIOS.

Yours,
** Bala....
** Bala....